
To replace freeze plugs without removing the engine, first, locate the freeze plug that needs to be replaced by inspecting the engine block. Once located, use a pry bar or a specialty tool to carefully remove the old freeze plug.
Then, clean the area around the freeze plug hole and apply sealant to the new freeze plug. Finally, use a freeze plug installer tool or a socket and hammer to tap the new freeze plug into place, ensuring a tight fit.
Preparation
Before attempting to replace freeze plugs without removing the engine, it is crucial to properly prepare and gather the necessary tools and materials. This will ensure a smooth and efficient process, saving both time and effort. In this section, we will walk you through the step-by-step preparation required for this task.
Gathering Necessary Tools And Materials
The first step in the preparation process is to gather all the essential tools and materials needed for replacing freeze plugs.By having everything ready in advance, you can avoid any unnecessary interruptions during the repair process. Here’s a list of the tools and materials you’ll need:
| Tools | Materials |
|---|---|
|
|
Make sure to gather all these tools and materials before starting the process. This will help you to stay organized and ensure that you have everything you need at your disposal.
Preparing The Vehicle
Once you have gathered all the necessary tools and materials, the next step is to prepare the vehicle for the freeze plug replacement. Proper preparation will ensure the safety of the vehicle and make the process more manageable. Here’s what you need to do:
- Park the vehicle on a level surface and engage the parking brake.
- Allow the engine to cool down completely. Safety should always be a priority, so it’s crucial to work on a cool engine to avoid any burns or injuries.
- Open the hood and locate the freeze plugs. Take a good look at their positioning and ensure you have easy access to the plugs that need to be replaced.
- Drain the coolant from the radiator. This will prevent any spills or leaks during the replacement process.
- Clean the area around the freeze plugs using a degreaser or a suitable cleaning agent. This will ensure a clean working environment and promote better adhesion of the sealant.
By following these steps, you will have effectively prepared the vehicle for the freeze plug replacement. Taking the time to properly prepare will allow for a streamlined repair process and increase the chances of a successful repair.
Locating The Freeze Plugs
Identifying the location of freeze plugs in the engine
Inspecting freeze plugs for signs of damage or leakage
When it comes to replacing freeze plugs, many people assume that removing the engine is necessary. However, there is a way to replace freeze plugs without going through the hassle of engine removal. In this section, we will focus on the first step of the process – locating the freeze plugs. By understanding their different types, identifying their location in the engine, and inspecting them for signs of damage or leakage, you can successfully replace freeze plugs without disrupting the entire engine.
Understanding The Different Types Of Freeze Plugs
Before diving into the process of locating freeze plugs, it’s important to understand that there are different types of freeze plugs used in engines. The most common types include:
- Expansion (cup) plugs
- Threaded freeze plugs
- Core or sand cast plugs
Each type of freeze plug has its own unique characteristics and placement within the engine. This understanding will help you in identifying and replacing the freeze plugs effectively.
Identifying The Location Of Freeze Plugs In The Engine
Freeze plugs are strategically placed in different locations within the engine to protect it from freeze-related damage. To locate the freeze plugs in your engine, you may need to consult the engine’s service manual or look for visual cues. Typically, freeze plugs can be found:
- Along the sides of the engine block
- On the engine head
- On the rear of the engine block
- In the cylinder heads
- On the intake manifold
However, keep in mind that the exact location of freeze plugs depends on the engine make and model. Refer to the specific engine manual or seek professional guidance if needed.
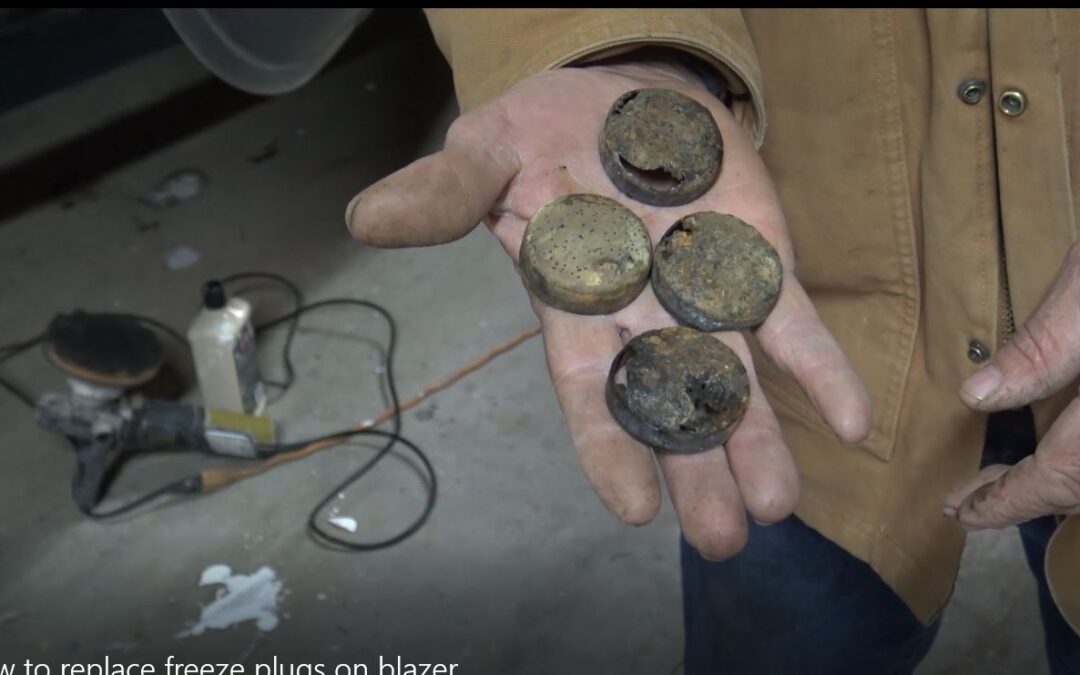
Inspecting Freeze Plugs For Signs Of Damage Or Leakage
Once you have successfully located the freeze plugs, the next step is to inspect them for any signs of damage or leakage. Carefully examine each freeze plug for the following:
- Cracks or splits
- Corroded or rusted areas
- Signs of coolant leakage
If you notice any of these issues, it is crucial to replace the freeze plug to avoid further damage to the engine. Additionally, ensure that the replacement freeze plugs are of the correct size and material for a proper fit.
Draining The Cooling System
When it comes to replacing freeze plugs without removing the engine, the first step is to drain the cooling system. This process ensures that you can work on the freeze plugs without any coolant leaking out. Here, we will discuss the steps involved in draining the cooling system effectively.
Preparing The Vehicle For Draining
To start, make sure you have the necessary tools and materials at hand. These include a drain pan, a socket set, pliers, and new freeze plugs. Once you are ready, park the vehicle on a level surface and engage the parking brake.
Removing The Radiator Cap
The next step is to remove the radiator cap. This will help release any pressure in the cooling system and allow the coolant to flow freely when draining. Ensure the engine has cooled down before attempting to remove the cap, as hot coolant can cause burns.
Draining The Coolant
Before you begin draining the coolant, position the drain pan beneath the radiator drain plug. This will catch the coolant and prevent any spills. Use a wrench or pliers to loosen the drain plug and allow the coolant to flow into the drain pan. If there is no drain plug, you may need to remove the lower radiator hose instead.
Once all the coolant has been drained, tighten the drain plug or reattach the lower radiator hose securely. Properly dispose of the old coolant according to local regulations, as it is toxic and harmful to the environment.
Flushing The Cooling System
After draining the coolant, it is essential to flush the cooling system thoroughly. This step helps remove any remaining debris or contaminants that may have accumulated over time. Use clean water to flush the system by pouring it into the radiator and allowing it to circulate. Repeat this process a few times until the water drains clear.
Finally, refill the cooling system with the appropriate type and amount of coolant recommended by the vehicle manufacturer. This step ensures that the cooling system operates at optimal temperature and helps prevent overheating.
By following these steps to drain the cooling system properly, you can continue with the freeze plug replacement process without any complications. Remember to take necessary safety precautions and consult a professional if you are unsure about any steps.
Removing The Old Freeze Plugs
If you’re faced with the task of replacing freeze plugs in your engine, but don’t want to go through the hassle of removing the entire engine, you’re in luck. With the right approach and tools, it’s possible to remove those troublesome freeze plugs without having to take out the engine. In this section, we will explore the process of removing the old freeze plugs and highlight the appropriate methods for doing so.
Determining The Appropriate Method For Removal
Before you begin removing the old freeze plugs, it’s important to determine the most suitable method for the type of freeze plugs you’re working with. There are various methods available, and choosing the right one will save you time and effort. Here are some factors to consider when determining the appropriate removal method:
- The material of the freeze plugs
- The location of the freeze plugs
- The accessibility of the freeze plugs
By taking these factors into account, you can narrow down the options and choose the method that will work best for your specific situation.
Using A Freeze Plug Removal Tool Or Alternative Methods
Once you have determined the appropriate removal method, it’s time to get down to work. One common method for removing freeze plugs is to use a freeze plug removal tool. This tool is designed specifically for this purpose and can make the job a lot easier. It allows you to apply force to the freeze plug, causing it to pop out.
If you don’t have access to a freeze plug removal tool, don’t worry. There are alternative methods that can be just as effective. One such method involves using a punch and hammer to drive the freeze plug inward until it comes loose.
Regardless of the method you choose, it’s important to work carefully and slowly. Applying too much force can cause damage to the surrounding area or even break the freeze plug. Take your time and proceed with caution to ensure a successful removal.
Once you have successfully removed the old freeze plugs using the appropriate method, you can move on to the next step of the freeze plug replacement process. Stay tuned for the next section, where we will explore the installation of new freeze plugs without having to remove the engine.
Installing New Freeze Plugs
Installing new freeze plugs is a crucial step in the process of replacing freeze plugs without removing the engine. This step ensures that the engine block is properly sealed and protected from leaks. In this section, we will guide you through the process of installing new freeze plugs, covering important topics such as choosing the correct size and type of freeze plug, preparing the new freeze plugs, applying sealant to the freeze plugs, and inserting them properly into the engine block.
Choosing The Correct Size And Type Of Freeze Plug
Before you start the installation process, it is important to choose the correct size and type of freeze plug for your engine block. Measure the hole where the freeze plug will be installed using a caliper or a measuring tape.
| Engine Model | Freeze Plug Size | Type |
|---|---|---|
| Ford F150 | 1-3/4 inches | Flat |
| Chevrolet Silverado | 1-1/2 inches | Concave |
| Toyota Camry | 1-7/8 inches | Domed |
Once you have determined the correct size, choose the type of freeze plug based on your engine manufacturer’s recommendations.
Preparing The New Freeze Plugs
- Inspect the new freeze plugs for any damages or defects before installation.
- Clean the freeze plug holes in the engine block using a wire brush to remove any dirt, debris, or rust.
- Apply a thin layer of engine oil or assembly lubricant to the outer surface of the freeze plugs to ease the installation process and prevent corrosion.
Applying Sealant To The Freeze Plugs
Applying sealant to the freeze plugs is essential to ensure a proper seal and prevent leaks. Follow these steps:
- Apply a small amount of high-quality adhesive sealant, such as RTV silicone, to the outer edge of the freeze plug.
- Distribute the sealant evenly around the entire circumference of the freeze plug.
- Ensure that the sealant layer is not too thick to interfere with the installation.
Inserting The New Freeze Plugs Into The Engine Block
Now that you have chosen the correct size and type of freeze plugs, prepared them, and applied sealant, it’s time to insert them into the engine block:
- Align the freeze plug with the hole and gently tap it into place using a suitable installation tool or a plastic hammer.
- Ensure that the freeze plug is inserted fully and sits flush with the engine block.
- Repeat the process for each freeze plug, paying attention to their respective locations.
By following these steps and paying attention to the details, you can successfully install new freeze plugs without removing the engine, ensuring a tight seal and preventing leaks. Take your time and be thorough in each step to ensure the longevity and performance of your engine.
Refilling The Cooling System
Learn how to replace freeze plugs in your engine without the hassle of removing it. This step-by-step guide will walk you through the process of refilling the cooling system with ease.
Refilling The System With Coolant
After successfully replacing the freeze plugs without removing the engine, the next step is to refill the cooling system with fresh coolant. This ensures that your engine stays at the right temperature and prevents it from overheating. Here’s how you can properly refill the cooling system:
- First, make sure that the engine is completely cool before starting the refill process. Opening a hot radiator can be dangerous and can cause coolant to spray out, resulting in burns.
- Locate the radiator cap, typically found on top of the radiator. Carefully remove the cap by twisting it counterclockwise. If there is excessive pressure, wait for the engine to cool down further before attempting to remove the cap.
- Using a funnel, slowly pour the appropriate type and amount of coolant into the radiator. Refer to your vehicle’s manual to determine the correct coolant for your specific make and model. Add the coolant until the radiator is full, but leave some space at the top to allow for expansion.
- Once you’ve filled the radiator, replace the cap and ensure it is securely tightened in a clockwise direction.
- Next, locate the coolant reservoir tank, usually placed near the radiator. Open the tank by either twisting the cap or pressing down and turning it counterclockwise, depending on the design.
- Using the same funnel, add coolant to the reservoir tank until it reaches the designated “full” or “max” line. This acts as a backup supply for the radiator.
- Replace the cap on the reservoir tank and ensure it is tightly secured.
Bleeding The Air From The Cooling System
Bleeding the air from the cooling system is a crucial step after refilling with coolant. Trapped air can hinder proper coolant circulation and cause overheating. Follow these steps to effectively bleed the air from your cooling system:
- Start the engine and let it idle. Allow it to warm up slowly and reach its normal operating temperature.
- While the engine is running, carefully monitor the temperature gauge. Ensure that it stays within the normal range.
- As the engine warms up, air bubbles may be released into the coolant system. This can cause the coolant level to drop. Keep an eye on the radiator and reservoir tank, adding more coolant if necessary.
- Gently squeeze the upper radiator hose to help release any trapped air pockets. Be cautious as the hose may be hot.
- Continue this bleeding process until there are no more visible air bubbles and the coolant levels remain constant.
Testing For Leaks
After refilling the cooling system and bleeding any trapped air, it’s important to test for leaks before fully operating your vehicle. Follow these steps to ensure a leak-free cooling system:
- Inspect the area around the freeze plugs you replaced. Look for any signs of coolant leakage, such as puddles or wet spots.
- Check underneath the vehicle for any drips or drops of coolant.
- Inspect the radiator, hoses, and connections for any visible leaks. Pay special attention to hose clamps and connections to ensure they are tight and secure.
- Start the engine and allow it to run for a few minutes. Observe the temperature gauge to ensure that it remains within the normal range.
- While the engine is running, carefully check for any new signs of leaks.
- If you notice any leaks, shut off the engine immediately and address the issue before driving your vehicle.
By following these steps to properly refill the cooling system, bleed the air, and test for leaks, you can ensure that your newly replaced freeze plugs continue to function effectively, keeping your engine cool and protected. Remember to regularly check your coolant levels and perform maintenance to prevent any future issues.
Final Steps And Tips
Once you have successfully replaced the freeze plugs without removing the engine, there are a few final steps and tips to keep in mind. By following these guidelines, you can ensure a thorough and effective freeze plug replacement process.
Reinstalling Any Removed Components
After the new freeze plugs are securely in place, it is important to reinstall any components that were removed during the process. This may include reconnecting hoses, belts, or other engine parts that were temporarily taken off to access the freeze plugs. Take your time to carefully reattach and secure each component to guarantee proper functioning and prevent any potential leaks.
Double-checking For Tightness And Proper Installation
Before considering the job complete, you must double-check the tightness and proper installation of the freeze plugs. Start by visually inspecting each plug to ensure it sits flush against the engine block. You can also run your fingertips over the edges of the plugs to check for any irregularities or gaps. Additionally, tighten the freeze plugs using a wrench or socket to eliminate any potential looseness that could lead to leaks.
Properly Disposing Of Old Coolant
During the freeze plug replacement process, you may have drained the coolant from your engine to access the plugs. It is essential to dispose of the old coolant responsibly to protect the environment. Avoid pouring it down the drain or onto the ground, as it can contaminate water sources. Instead, collect the coolant in a suitable container and take it to a recycling center or drop-off location that accepts used automotive fluids.
Additional Tips For Successful Freeze Plug Replacement
Here are some additional tips to ensure a successful freeze plug replacement:
- Use a freeze plug installation tool or a socket of the correct size to gently tap the freeze plugs into place, ensuring they are seated properly.
- Apply a thin layer of RTV silicone sealant to the outer edge of the freeze plugs before installation, creating a tight seal to prevent leaks.
- Inspect nearby freeze plugs for signs of damage or degradation while you have access to them, and consider replacing them proactively if necessary.
- Keep a container or towel handy to catch any coolant that may spill during the installation process.
- Consider flushing your cooling system and adding fresh coolant after completing the freeze plug replacement to maintain optimal engine performance.
By following these final steps and tips, you can ensure a successful freeze plug replacement without removing the engine. Remember to always take your time, pay attention to detail, and prioritize proper installation to avoid future issues with your engine’s cooling system.
Frequently Asked Questions For How To Replace Freeze Plugs Without Removing Engine
Do You Have To Pull The Engine To Replace Freeze Plugs?
No, pulling the engine is not necessary to replace freeze plugs. They can be accessed and replaced by removing other components like the exhaust manifold or cylinder head. It is recommended to consult a professional mechanic for proper replacement.
Do You Put Anything On Freeze Plugs When Installing?
No, freeze plugs do not require any additional substances for installation. They are designed to fit snugly into the engine block without any coating or sealing. Simply install the freeze plugs securely in their designated locations.
How Do You Get A Freeze Plug Out Of A Block?
To remove a freeze plug from a block, follow these steps: 1. Drain the coolant from the system. 2. Use a pry bar or screwdriver to carefully pry out the old freeze plug. 3. Clean the area around the hole.
4. Install a new freeze plug by tapping it into place. 5. Refill the coolant and check for any leaks.
Is A Freeze Plug Easy To Fix?
Fixing a freeze plug is relatively easy. It involves draining the coolant, removing the old plug, and installing a new one. With some basic tools and know-how, you can handle this task yourself. However, if you’re unsure, it’s best to seek professional help to prevent any further damage.
Conclusion
To conclude, replacing freeze plugs without removing the engine is a feasible task that can save time and money. By following the step-by-step guide provided in this blog post, you can successfully replace freeze plugs with ease. Remember to gather all the necessary tools and materials and take extra caution while working on such delicate components.
With this knowledge, you can confidently address freeze plug issues and keep your engine running smoothly without the need for expensive repairs.


Leave a Reply